November 2012 Day 67 - It's Alive and a solar eclipse

Today started off with a Solar Eclipse, we had our eclipse glasses from "Ice in Space" and they where well worth the $3.50 price tag.

Photobucket
So back to car's, over the past few weeks I've been building another car, one to match the rally car, just not as large.  I picked up this 1:24 model off eBay a few months back and had been meaning to put it together, just needed to find some time.  The stickers where all shot, being a 15 year old model they where just not meant to last that long I guess.  So I decided to used the spray paint I used to spray the bumper of the rally car so the two cars match, I also kept the colour matching on the inside of the car.  The box showed the car as blue, I can only remember them as either white or yellow, either way this one is going to be unique.

PhotobucketPhotobucket

I've also been creating a few fibreglass bits for the car, honing my skills with the resin, these items are an electric window control box, utilising the existing controller, and a steering wheel backing plate for buttons, I'm not sure what buttons yet at the moment the horn is all I can think of putting on there.


PhotobucketPhotobucket


I also had a birthday during September where I picked up my last bit of driver gear, my family got me my driving suit and now I have everything I need to get in the car and do some rally's.  Its a bit black and white, but it all matches, and that's the main thing is it not?
Photobucket


So today finished with a trip down to NA Autosport & Engineering to see how the MoTeC tune was coming along.  Nick had worked his magic and wired in an EVO 4-8 unit into the car, why an EVO and not a Subaru, well MoTeC don't cater for a car of this age, so it was down to finding a unit that had a similar plug arrangement.  From the picture below you can see an adapter lead was eventually made up to suit the ECU. Nick then did his thing with a tune from an early WRX and the car was ready to start.
Photobucket


Click on the link to see the car start for the first time in 3 years, (3" Turbo back exhaust, no CAT).
After 3 years the car is now Alive and kicking

This week it's dyno time to see how many horses it can produce, Blue plate engineering check and then its on the home straight.

September 2012 - Day 66 Shed is done, Car is almost as well

Good news on the build, Winter has finished and its starting to warm up here in Queensland, it gets you motivated to get out and get things done. The other good news is that the shed is finished, all the shelving and benches are in and the painting done, I now have somewhere to work that is clean and warm with good lighting.

So the car, well I have a CAMS log book for the car now everything was approved based on 2011 roll cage regs, quick turn around I had the paperwork in on Friday and the Log book the following week. The car itself is at NA Autosports and Engineering, I've got Nick and the team doing a few extra bits to the car, mainly items that I was not to sure how to do or didn't have the tools to do, I thought it best using their past Prodrive experience to get things done right the first time.

Since the last update they have installed the Hydraulic Handbrake, it will have about 50-80mm of travel at the top


Installed the bash plate


Made and installed a new stainless 3" Turbo back no cat exhaust.


Run the oil temp and pressure gauges from the engine block


Installed some under guard impact protection


Made and installed the air intake pipe and box


Installed Hydraulic power steering lines


Installed the fuel system


Installed the Oil Cooler


The car now is almost ready to start, with the engine, gearbox, brakes, fuel, oil and air systems done there wasn't that much left for me to do mechanically, so I've left the car at NA Autosprts and Engineering to complete the install the MoTeC and wired up the DCCD, get the car started and on the dyno

I've still got a number of things to do to get the car finished, I've started the door card's, fitting the electric window controllers, nav light, wiring for the front lights, tool storage, safety gear storage and cleaning and painting some of the parts that need to go back on the car.

Photobucket

June Update - The Car v The Shed

Hi everyone progress on the car has slowed a little since the last time I posted.  The big push over the past few months is to get the shed extensions completed before it starts to rain here in Queensland.  The good news is the shed is now at lockup stage just as the rain has started here, with just some internal cladding
to complete the project.  I now have a dry clean work area for the car and I can work on the car at nights, which I have not been able to do in the past.

Although my priority has been to get the shed build, (I'm building it all myself), the car is still being progressed by others, its made its way back to NA Autosport and Engineering to have some bits a pieces installed, mostly items that where to heavy or I was not confident in tackling myself.  So far Nick and the guys have installed the flywheel, clutch and 6 speed gearbox into the car, and will be running the
brake and fuel lines in the car as well as installing a new set of 50mm DMS (Drummond Motor Sports) suspension.  We where going to replace all the rubber bushes in the rear suspension, but due to the floods in Japan we have not been able to get any new bushes from Subaru in time, so the rear suspension has been
upgrades to newer STI items with trailing arms, rear links, strut tops and sway bars all replaced.  Now when you look under the car its all just about STI gear, the only items that are not STI are the front and rear cross members and the RS auto drive shaft, (not including the engine which is stock RS).


The car has also had the paper work completed to get a CAM's log book, thanks to Dave the scrutineer who kindly came out and gave the car the tick of approval.  For the car to be approved based on the 2011 roll cage specs I have to have the paper work done by August this year.

Once the car is done at NA Autosport and Engineering and in the new shed, I will be looking at getting the rest of the car together, turbo, intercooler, engine electrics and push the big red button and see what happens.....to be continued...

April 22th 2012 - Day 63 - The light at the end of the tunnel

I keep meaning put more into this Blog, but I just never find the time.  It's been 3 months since the last update and yes a lot has been done to the car.  Most of the work has been centred on the inside of the car.  Most of the electrical work has been done, with only a few items left to wire in, including the DCCD controller, Nav Light and the Nav switch well that's all I can think of right now.
The dash mods got a working over as did the wiring diagram, basically I rewired the dash and replaced the switches I started with, with a set of 6 switches I purchased from a boating supplier, this both looks neater and works better.  I'm finding out that the third time I do things it's the right way.  I've also run the battery power leads, these are made up of welding earth cables with large terminals, purchased from a welding supplier.

Updated Wiring diagram


Photobucket Photobucket Photobucket

After a few tests with the multimeter I turned on the new switches and tested everything, and so far everything worked, rally computer sprung to life, gauges, new window heaters, Stilo headsets, and all of the normal car electrics.  When I say everything worked, the horn didn't, well not at first, it took me about 3hrs to finally work out that I had forgotten to plug a connector together under the dash.  Anyone doing one of these cars in the future, the wiring diagram is wrong, the horn signal is part of the cruise control plug that comes from the instruments.

One of the items on the to do list was the Aero Catches or bonnet latches, it's something you need on the car, but you need to cut into your bonnet and there is no going back once you start.  So last weekend I took to the car with a die grinder and drill, in the end the results were good, no mistakes and the job looks clean.  I also wrote a quick how to for anyone looking at doing the same thing, you can find it here, Aero Catches Install


Photobucket

Next item was to install the bigger brakes, these are from the 2003 STi and just clear the 15in rims I have, nice and shiny.

Photobucket Photobucket

Today I had a bit of time and so started installing some roll cage padding, installed and high density padding around the head area, and the cheaper padding around the legs.  I'm not to happy with the cheaper padding as it's so thick, so I'm thinking of going the high density padding here as well.


Photobucket Photobucket

So what's next for the car?  Well I need to get the gearbox in and the car started, also have the hydraulic handbrake mounted next to the gear stick and then I can run the brake and fuel lines in the car.  Once that is done I'm on the home straight, that will only leave a few smaller items and the new shocks left to do.

Photobucket


Jan 27th 2012 - Day 57 - The rebuild is well underway

Hi all, well the car is at home and I've been working on it over the Christmas and New Year's break, that is when I get time. It's been interesting, remembering what order to put things in, where things are and what bolt to use where.  There has been a lot of looking at photo's I took when I pulled everything apart and looking at the Subaru service manuals, so far I've been able to fit things together.

Well the first job was to prep and paint the inside, roll cage, boot and engine bay. It took a while, about 1 solid week scrubbing ever part to be painted by hand, its a long and boring job, but if you do it right it should last. Then 3 coats of KBS anti-rust paint, brush and rolled it on, the paint was great it spread so well and ended up looking very smooth with no imperfections, it's silver so it sort of matches the cars colour.

PhotobucketPhotobucket

In between coats, and days where I didn't want to paint, I started putting other bits and pieces of the car back together. The fuel tank and filler system was first back into the car, followed by the rear end panels. The doors also went on, I wanted to see how the trims where going to fit now there where roll cage bars everywhere, the good news is the electric door switches miss the roll cage, bad news is that about all that misses the roll cage, I'm sure I can build my own door trims, but we will see, to be continued.

Photobucket


The next job was the wiring loom, I had a good idea how this went back into the car but with the roll cage covering some of the major enters into the car it was going to be tight, and it was, but it all seemed to fit which was a great relief.
One job I did back 6 months ago was to label the whole loom, every plug has a green dyno label with the description and the page in the manual where it is on the wiring diagram. Now I'm connecting plugs, this has helped greatly, I know what plugs into what and what plugs I don't need any more.

PhotobucketPhotobucket

Day 56 of the build, and a milestone, the engine is in. It would of been nice if the shed had been complete, at least the concrete, so I didn't have to move a crane over rocks and dirt, but it's done now, and no more heavy lifting as the gearbox is being put in by NA Autosport & Engineering.

Photobucket


Now with the engine in, I thought it would be a good idea to get the front end together, make some room in the shed and around the house. Just need to get the radiators pressure tested and they and the rest of the front end will be back on.
Photobucket


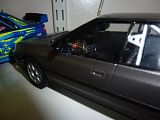
Today the windows went back in, new front one, after I put both my feet though the old one, and the old rear window, so now the car is locked and sealed, which is good with all of this rain about.

PhotobucketPhotobucket

Next I can start to fit out the interior of the car, dash will be first off, I need to get it in and then seat and belts, and you start thinking what's left.  But there is a lot still to do, for a start there is nothing from the engine back....

Photobucket

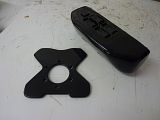
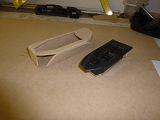
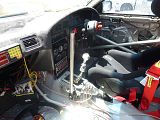
This is the dash mods so far, I've removed the ignition switch and steering lock, and gone for a push button and switch, a few new gauges and accessory buttons and big FIA safety switch.  The wiring diagram of the mods is below if you're interested.

Photobucket