Move to Facebook.
92 RS Rally
Sep 2013 - Autocross and Dirt sprints
It’s been a while since the last update, no excuses just been very busy doing other things. The car is basically finished, I do need to fix an electrical issue before going rallying, the speedo signal to the rally computer needs the signal boosted, as both the speedo and computer go crazy when they are paired.
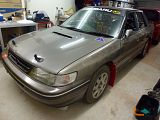
The good news is I have run the car in two events so far, August Autocross and Septembers Dirt Sprint on the dirt track at Queensland Raceway Willowbank.
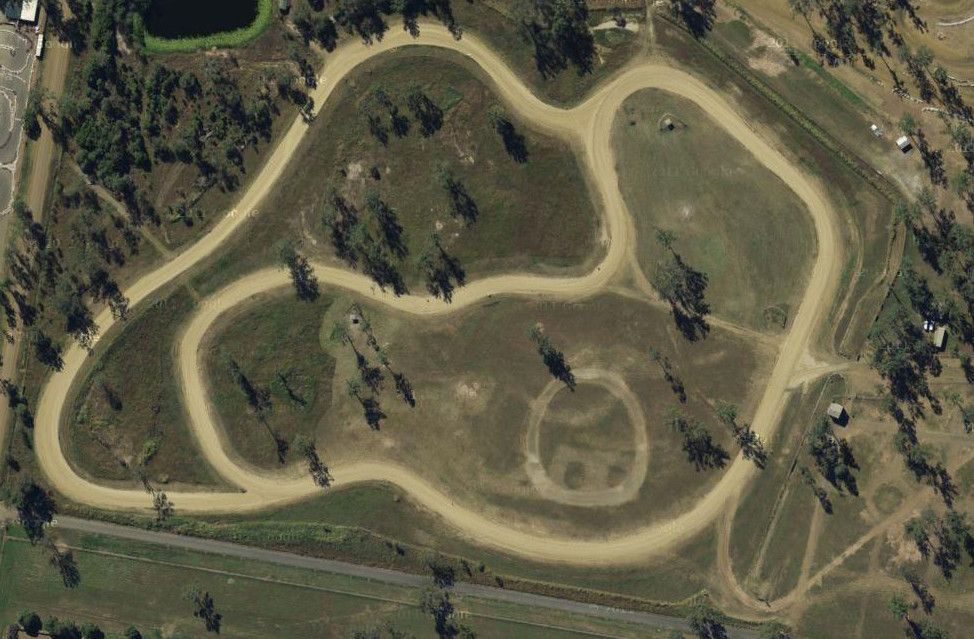
Queensland Raceway dirt track Willowbank - Auto Cross is the inner track, Dirt Sprint the outer track.
The start point it middle right, running clock wise.
Event - Ipswich West Morten Auto Club (http://iwmac.org.au/) August Autocross Round 4 As this was the first run for the car the idea was to run the car and over the day increase the speed until either I reached my driving skills level or the car showed signs of an issue. The Autocross is run with each car completing 6 two lap runs and the best 5 runs added together to get the final result. Only issue was I only found that out after the first run was done, so my time was not the best, but the car did handle well, on the faster second lap. During the day I lowered my times each run, getting more confident with the car, the last run I was 10th fastest out of 44 cars. The next Autocross is in October where I hope to do better again.
Results - http://iwmac.org.au/wp-content/uploads/2013/08/130818_RESULTS.pdf
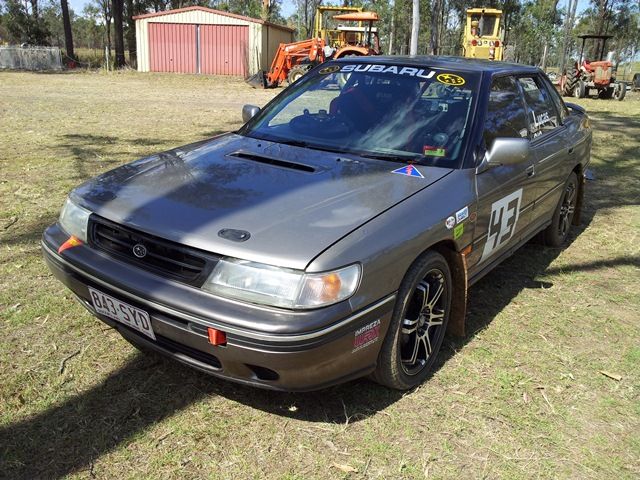
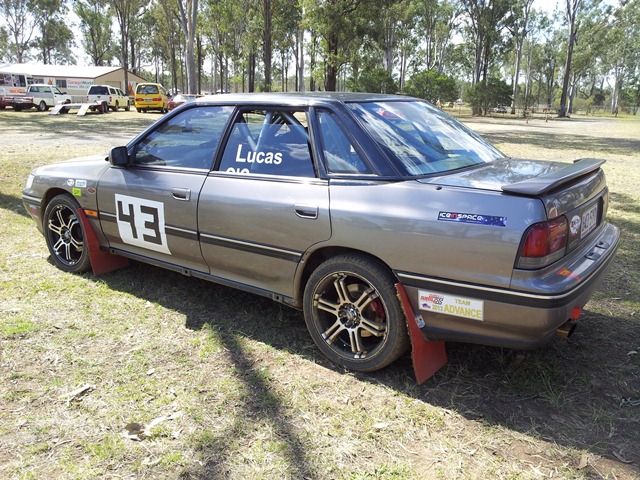
The number was not chosen by myself, but I ended up going off like KB.
It was a great day, now looking forward to Octobers Autocross and then Novembers Dirt sprint.
The good news is I have run the car in two events so far, August Autocross and Septembers Dirt Sprint on the dirt track at Queensland Raceway Willowbank.
Queensland Raceway dirt track Willowbank - Auto Cross is the inner track, Dirt Sprint the outer track.
The start point it middle right, running clock wise.

Event - Ipswich West Morten Auto Club (http://iwmac.org.au/) August Autocross Round 4 As this was the first run for the car the idea was to run the car and over the day increase the speed until either I reached my driving skills level or the car showed signs of an issue. The Autocross is run with each car completing 6 two lap runs and the best 5 runs added together to get the final result. Only issue was I only found that out after the first run was done, so my time was not the best, but the car did handle well, on the faster second lap. During the day I lowered my times each run, getting more confident with the car, the last run I was 10th fastest out of 44 cars. The next Autocross is in October where I hope to do better again.
Results - http://iwmac.org.au/wp-content/uploads/2013/08/130818_RESULTS.pdf
Event - Ipswich West Morten Auto Club (http://iwmac.org.au/) September Dirt Sprint
Round 4
This was on last weekend, as the car had
not been run for a month, on the Saturday I took it for a quick spin, on
returning coolant was running out of the car all over the floor, crap! After the car cooled down, I found a hose
that ran between the engine block and the timing belt cover had split. This hose and the one beside it where both from
the original engine, should have replaced the hoses when I did the
rebuild. After an hour of taking skin
off my hands and a lot of swearing, both the hoses where off. A quick trip down to the local auto supplier,
(15mins before closing time) and I had two new hoses ready to fit. Installed both of the hoses, they were not
designed for the location they were going so the water flow through them was
not going to be the best, but as one went to the cabin heater that no longer
existed, and the other to the filler cap, I was not too worried. Took the car for a quick test drive, all
fixed, or was it? The next morning
packed the car and headed to the petrol station, filled up the car and headed
off, about 5mins down the road and the temperature gauge hit 120degC and then
the car shut down. Thought crap, so
waited 10miins and slowly limped home where I found that the two none fitting
hoses had left air in the system. So
10mins of filling the system with water, squeezing hoses and more water finally
saw the car start and remain at a reasonable temperature, the rest of the day
it was fine.
The Dirt sprint is run with 6 two lap runs
with the fastest run counted, the track this time was covered with loose gravel
and was being constantly watered by the water truck, which turned the track
into mud, great for sideways action, not too good for going fast. The first few runs where fast, but nothing to
write about, then the track started to get clean and quick, my 4th
run was behind the water truck, so it was slippery but I was able to put in a
okay time. The 5th run which
ended up being my fastest felt quick, but had some messy corners and braked to
early. The 6th run, I was going quick, late braking and getting good
drive out of the corners, then the last corner of the first lap the rear wheels
hit the loose stuff and the car was sideward across the track, looks good on
the video I guess….

The number was not chosen by myself, but I ended up going off like KB.

It was a great day, now looking forward to Octobers Autocross and then Novembers Dirt sprint.
Jan 2013 Day 71 - The Push is on to get everything done.
Over the past few months I've been pushing to get all the small jobs done and get the car to a stage where I can get it on the road and competing in some motorkhana's. As with anything the small jobs seem to take the longest to do as they are either fiddly or require some skill that I'm yet to posses.
The list of things still yet to be completed since the last post where,
Install air shroud around the intercooler radiator to get better air flow
Secure front grill and bumper
Electric safety switch pull wire
Fit Mud flaps
Fit new door trims including electric window and door closing
Install a Navigator light
Wire the Brantz navigator foot reset and speedo connection
Wire and install the steering wheel electrics including horn
Mount fire extinguisher, Safety Triangle, SOS sign, Jack and Tools
Install pedals and footrest for the driver
Install some protection on the drivers side floor
Adjust seats and belts
Seal all holes inside the car from dust
Install racing rear-view mirror
Install extra roll cage padding
While the list looks straight forward, each of the items took me some time to do.
Install air shroud around the intercooler radiator. The reason this was done, is when the car was being tuned, the inlet air temperature was getting up around 40degC even with a large industrial fan blowing on the intercooler. We think that the air is going around the intercooler and not though it. So I made up a shroud that is connected to the front bumper that fits neatly onto the intercooler. If this is still an issue later modifications to the bumper may need to be done as it covers 1/2 of the intercooler.
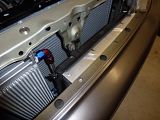
Secure front grill and bumper, as with most things in these modern cars, plastic clips seems to be used everywhere to secure items, as for the grill it was held in with 6 plastic clips where 1/2 where either broken or near broken, these where replaced with cable ties. The bumper required new bolts as the old bolts had rusted so badly they broke when the bumper was removed.
Electric safety switch pull wire was installed and tested, but when the wire was bent it would not pull at all, so it was taken apart and cleaned, some graphite used to make the wire move smoothly and then installed.
Fit Mud flaps, this took some time to install, the factory ones are molded to fit the contours of the wheel arch, but with these being flat sheets some massaging needed to happen. After a few different versions of cardboard mud flaps the final design was transferred to the rubber, drilling holes and nutserts inserted and they where installed.

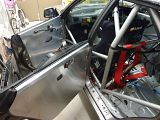
Fit new door trims including electric window and door closing, this was an interesting job, I was not to sure how to do this, many sleepless nights wondering what to make them from, how to seal the window, make the electric windows work and how to close the doors with the roll-cage across the doors.
The CAMS manual has the following;
11.3 Doors and Door Trim:
(a) It is permitted to remove the soundproofing material from the doors, provided that this does not modify the shape of the doors. In the case of a two-door car, the trim situated beneath the rear side windows may also be removed but must be replaced with panels made from composite material, save for utes in which case such trim is not required to be replaced.
(b) It is permitted to remove the trim from the door together with the side protection bar in order to install a side protection panel which is made from composite materials.
(c) If the side protection bars in the doors are not removed, the door panels may be made from metal sheeting at least 0.5mm thick, from carbon fibre at least 1mm thick or from another solid and non-combustible material at least 2mm thick. The minimum height of this panel must extend from the base of the door to the maximum height of the door strut. It is permitted to replace electric winders with manual ones.
I had only removed the door trims and not the side protection bars, so 0.75mm Aluminium sheet should be fine to use. I made up some cardboard templates for each door, cut out the electric window switches and the window seals also from the original door trims, fitted it to the made-up door trims and went from there.
Once I had the templates complete I then transferred everything to the aluminium sheets, bent them up using some angle I had laying around, cut holes and fitted the window switches then riveted the window seals to finish them off. Next was fixing the trims to the doors and this was done using 5mm nutserts and screws, the nutserts fitted neatly into the existing holes used by the original trim with a couple of new holes drilled to hold the sheet flat. The electrics where then connected and everything worked.
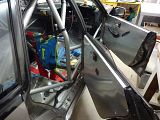
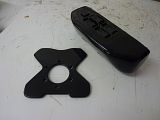
Install a Navigator light, this was done when the door trims above where being done. I'd seen a few different location to mount the navigator light including from the dash, mounted from the roll-cage on the A pillar, above the door, and behind the navigator and on the door. I decided to go with the door location, it was easier to it to a flat surface and seems to be a good location.
Wire the Brantz navigator foot reset and speedo connection, nothing to exciting here, found the speedo signal coming from the MoTeC and made a connection, a few runs up and down the drive showed it was working. The foot reset had two wires, one to an earth the other to the Brantz, the switch was then mounted to the foot rest using Velcro so it can be adjusted.
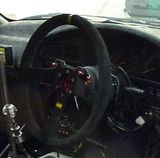
Wire and install the steering wheel electrics including horn, I'd made a steering wheel backing plate from the last post. Added a few buttons, one for the horn, the other at the moment is not connected, then mounted it to the steering wheel and connected up the horn.
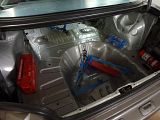
Mount fire extinguisher, Safety Triangle, SOS sign, Jack and Tools, this job is still on going, I've mounted one fire extinguisher under the navigators seat, the other will go into the boot as well as the tool boxes. I had been looking at different ways to mount a tool box and the other items in the boot, and was struggling to work out what to do. Then on the weekend I went into an army disposal shop and stumbled upon bullet and detonator boxes, these things are lightweight and come in different sizes perfect for tools. The boxes are going to be bolted to the floor with one holding tools and the other the electric torque wrench.
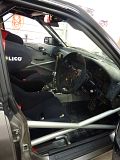
Install pedals and footrest for the driver, I purchased a few small items from Rally Nuts in the UK including a set of pedals and a drivers foot rest. I found that installing the foot rest a bit of a challenge due to the limited room in the Subaru and also due to the size of the foot rest, it was massive, but I finally got it to fit. The pedals made the clutch and brake pedals a little wider and gave some traction to the pedals, to mount these it was a few holes into the existing pedals and that's it.
Install some protection on the drivers side floor, the floor area the drivers feet has a few welded plugs and double skin which has been welded and so would not be the best for feet that would be moving about a lot. So I found some floor rubber at Bunnings that did the job, just to cover the floor and give a smooth surface to work on.
Install racing rear-view mirror, something else I picked up from Rally Nuts in the UK. At the time I thought it would be a good idea to have a wider rear-view mirror, not that I'm going to be worried about anything behind me, but when driving the car on the open road it would be handy to be able to see better out of the car and with the seat and cage, its tight in there. The mirror comes with roll-cage mounts but using these the mirror was only inches from my face, so I made up some new mounting brackets and set it against the windscreen. The field of view in the mirror when seated is great, you can see from the B pillar to the B pillar in the car.
So that is what I have been doing these past few months, the list is getting smaller on what needs to be done, the main item to get done now is to get the car registered in Queensland so it can be used, but that is where the problems starts. It seems that since December 2012 the transport authority here in Queensland has no longer been issuing Limited Use Licenses, mainly due to some people doing the wrong thing and CAMS turning a blind eye to the situation. Here in Queensland if you have a roll-cage in a car, you can't run the car on a normal registration you need to run Limited Use License, everyone knows that, CAMS and the competitors and in the past they have turned a blind eye, to me its strange as insurance would not cover anyone if they knew what was going on. So until the stand off is resolved the car is stuck in the shed and doing the odd 20 meters up and down the drive to annoy the neighbours, I hope to get it on the road and do a few test runs and the odd motorkhana before the first round of the Queensland Rally Championship in April.
The list of things still yet to be completed since the last post where,
Install air shroud around the intercooler radiator to get better air flow
Secure front grill and bumper
Electric safety switch pull wire
Fit Mud flaps
Fit new door trims including electric window and door closing
Install a Navigator light
Wire the Brantz navigator foot reset and speedo connection
Wire and install the steering wheel electrics including horn
Mount fire extinguisher, Safety Triangle, SOS sign, Jack and Tools
Install pedals and footrest for the driver
Install some protection on the drivers side floor
Adjust seats and belts
Seal all holes inside the car from dust
Install racing rear-view mirror
Install extra roll cage padding
While the list looks straight forward, each of the items took me some time to do.
Install air shroud around the intercooler radiator. The reason this was done, is when the car was being tuned, the inlet air temperature was getting up around 40degC even with a large industrial fan blowing on the intercooler. We think that the air is going around the intercooler and not though it. So I made up a shroud that is connected to the front bumper that fits neatly onto the intercooler. If this is still an issue later modifications to the bumper may need to be done as it covers 1/2 of the intercooler.


Secure front grill and bumper, as with most things in these modern cars, plastic clips seems to be used everywhere to secure items, as for the grill it was held in with 6 plastic clips where 1/2 where either broken or near broken, these where replaced with cable ties. The bumper required new bolts as the old bolts had rusted so badly they broke when the bumper was removed.
Electric safety switch pull wire was installed and tested, but when the wire was bent it would not pull at all, so it was taken apart and cleaned, some graphite used to make the wire move smoothly and then installed.
Fit Mud flaps, this took some time to install, the factory ones are molded to fit the contours of the wheel arch, but with these being flat sheets some massaging needed to happen. After a few different versions of cardboard mud flaps the final design was transferred to the rubber, drilling holes and nutserts inserted and they where installed.


Fit new door trims including electric window and door closing, this was an interesting job, I was not to sure how to do this, many sleepless nights wondering what to make them from, how to seal the window, make the electric windows work and how to close the doors with the roll-cage across the doors.
The CAMS manual has the following;
11.3 Doors and Door Trim:
(a) It is permitted to remove the soundproofing material from the doors, provided that this does not modify the shape of the doors. In the case of a two-door car, the trim situated beneath the rear side windows may also be removed but must be replaced with panels made from composite material, save for utes in which case such trim is not required to be replaced.
(b) It is permitted to remove the trim from the door together with the side protection bar in order to install a side protection panel which is made from composite materials.
(c) If the side protection bars in the doors are not removed, the door panels may be made from metal sheeting at least 0.5mm thick, from carbon fibre at least 1mm thick or from another solid and non-combustible material at least 2mm thick. The minimum height of this panel must extend from the base of the door to the maximum height of the door strut. It is permitted to replace electric winders with manual ones.
I had only removed the door trims and not the side protection bars, so 0.75mm Aluminium sheet should be fine to use. I made up some cardboard templates for each door, cut out the electric window switches and the window seals also from the original door trims, fitted it to the made-up door trims and went from there.
Once I had the templates complete I then transferred everything to the aluminium sheets, bent them up using some angle I had laying around, cut holes and fitted the window switches then riveted the window seals to finish them off. Next was fixing the trims to the doors and this was done using 5mm nutserts and screws, the nutserts fitted neatly into the existing holes used by the original trim with a couple of new holes drilled to hold the sheet flat. The electrics where then connected and everything worked.


Install a Navigator light, this was done when the door trims above where being done. I'd seen a few different location to mount the navigator light including from the dash, mounted from the roll-cage on the A pillar, above the door, and behind the navigator and on the door. I decided to go with the door location, it was easier to it to a flat surface and seems to be a good location.
Wire the Brantz navigator foot reset and speedo connection, nothing to exciting here, found the speedo signal coming from the MoTeC and made a connection, a few runs up and down the drive showed it was working. The foot reset had two wires, one to an earth the other to the Brantz, the switch was then mounted to the foot rest using Velcro so it can be adjusted.
Wire and install the steering wheel electrics including horn, I'd made a steering wheel backing plate from the last post. Added a few buttons, one for the horn, the other at the moment is not connected, then mounted it to the steering wheel and connected up the horn.

Mount fire extinguisher, Safety Triangle, SOS sign, Jack and Tools, this job is still on going, I've mounted one fire extinguisher under the navigators seat, the other will go into the boot as well as the tool boxes. I had been looking at different ways to mount a tool box and the other items in the boot, and was struggling to work out what to do. Then on the weekend I went into an army disposal shop and stumbled upon bullet and detonator boxes, these things are lightweight and come in different sizes perfect for tools. The boxes are going to be bolted to the floor with one holding tools and the other the electric torque wrench.

Install pedals and footrest for the driver, I purchased a few small items from Rally Nuts in the UK including a set of pedals and a drivers foot rest. I found that installing the foot rest a bit of a challenge due to the limited room in the Subaru and also due to the size of the foot rest, it was massive, but I finally got it to fit. The pedals made the clutch and brake pedals a little wider and gave some traction to the pedals, to mount these it was a few holes into the existing pedals and that's it.
Install some protection on the drivers side floor, the floor area the drivers feet has a few welded plugs and double skin which has been welded and so would not be the best for feet that would be moving about a lot. So I found some floor rubber at Bunnings that did the job, just to cover the floor and give a smooth surface to work on.

Install racing rear-view mirror, something else I picked up from Rally Nuts in the UK. At the time I thought it would be a good idea to have a wider rear-view mirror, not that I'm going to be worried about anything behind me, but when driving the car on the open road it would be handy to be able to see better out of the car and with the seat and cage, its tight in there. The mirror comes with roll-cage mounts but using these the mirror was only inches from my face, so I made up some new mounting brackets and set it against the windscreen. The field of view in the mirror when seated is great, you can see from the B pillar to the B pillar in the car.

So that is what I have been doing these past few months, the list is getting smaller on what needs to be done, the main item to get done now is to get the car registered in Queensland so it can be used, but that is where the problems starts. It seems that since December 2012 the transport authority here in Queensland has no longer been issuing Limited Use Licenses, mainly due to some people doing the wrong thing and CAMS turning a blind eye to the situation. Here in Queensland if you have a roll-cage in a car, you can't run the car on a normal registration you need to run Limited Use License, everyone knows that, CAMS and the competitors and in the past they have turned a blind eye, to me its strange as insurance would not cover anyone if they knew what was going on. So until the stand off is resolved the car is stuck in the shed and doing the odd 20 meters up and down the drive to annoy the neighbours, I hope to get it on the road and do a few test runs and the odd motorkhana before the first round of the Queensland Rally Championship in April.
November 2012 Day 67 - It's Alive and a solar eclipse
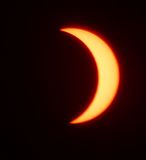
Today started off with a Solar Eclipse, we had our eclipse glasses from "Ice in Space" and they where well worth the $3.50 price tag.
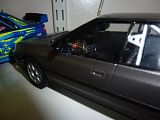
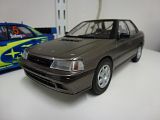
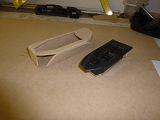
 So back to car's, over the past few weeks I've been building another car, one to match the rally car, just not as large. I picked up this 1:24 model off eBay a few months back and had been meaning to put it together, just needed to find some time. The stickers where all shot, being a 15 year old model they where just not meant to last that long I guess. So I decided to used the spray paint I used to spray the bumper of the rally car so the two cars match, I also kept the colour matching on the inside of the car. The box showed the car as blue, I can only remember them as either white or yellow, either way this one is going to be unique.
I've also been creating a few fibreglass bits for the car, honing my skills with the resin, these items are an electric window control box, utilising the existing controller, and a steering wheel backing plate for buttons, I'm not sure what buttons yet at the moment the horn is all I can think of putting on there.
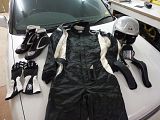
I also had a birthday during September where I picked up my last bit of driver gear, my family got me my driving suit and now I have everything I need to get in the car and do some rally's. Its a bit black and white, but it all matches, and that's the main thing is it not?
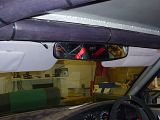
So today finished with a trip down to NA Autosport & Engineering to see how the MoTeC tune was coming along. Nick had worked his magic and wired in an EVO 4-8 unit into the car, why an EVO and not a Subaru, well MoTeC don't cater for a car of this age, so it was down to finding a unit that had a similar plug arrangement. From the picture below you can see an adapter lead was eventually made up to suit the ECU. Nick then did his thing with a tune from an early WRX and the car was ready to start.
Click on the link to see the car start for the first time in 3 years, (3" Turbo back exhaust, no CAT).
After 3 years the car is now Alive and kicking
This week it's dyno time to see how many horses it can produce, Blue plate engineering check and then its on the home straight.
I've also been creating a few fibreglass bits for the car, honing my skills with the resin, these items are an electric window control box, utilising the existing controller, and a steering wheel backing plate for buttons, I'm not sure what buttons yet at the moment the horn is all I can think of putting on there.
I also had a birthday during September where I picked up my last bit of driver gear, my family got me my driving suit and now I have everything I need to get in the car and do some rally's. Its a bit black and white, but it all matches, and that's the main thing is it not?
So today finished with a trip down to NA Autosport & Engineering to see how the MoTeC tune was coming along. Nick had worked his magic and wired in an EVO 4-8 unit into the car, why an EVO and not a Subaru, well MoTeC don't cater for a car of this age, so it was down to finding a unit that had a similar plug arrangement. From the picture below you can see an adapter lead was eventually made up to suit the ECU. Nick then did his thing with a tune from an early WRX and the car was ready to start.
Click on the link to see the car start for the first time in 3 years, (3" Turbo back exhaust, no CAT).
After 3 years the car is now Alive and kicking
This week it's dyno time to see how many horses it can produce, Blue plate engineering check and then its on the home straight.
September 2012 - Day 66 Shed is done, Car is almost as well
Good news on the build, Winter has finished and its starting to warm up here in Queensland, it gets you motivated to get out and get things done. The other good news is that the shed is finished, all the shelving and benches are in and the painting done, I now have somewhere to work that is clean and warm with good lighting.
So the car, well I have a CAMS log book for the car now everything was approved based on 2011 roll cage regs, quick turn around I had the paperwork in on Friday and the Log book the following week. The car itself is at NA Autosports and Engineering, I've got Nick and the team doing a few extra bits to the car, mainly items that I was not to sure how to do or didn't have the tools to do, I thought it best using their past Prodrive experience to get things done right the first time.
Since the last update they have installed the Hydraulic Handbrake, it will have about 50-80mm of travel at the top

Installed the bash plate

Made and installed a new stainless 3" Turbo back no cat exhaust.


Run the oil temp and pressure gauges from the engine block


Installed some under guard impact protection

Made and installed the air intake pipe and box

Installed Hydraulic power steering lines

Installed the fuel system

Installed the Oil Cooler

The car now is almost ready to start, with the engine, gearbox, brakes, fuel, oil and air systems done there wasn't that much left for me to do mechanically, so I've left the car at NA Autosprts and Engineering to complete the install the MoTeC and wired up the DCCD, get the car started and on the dyno
I've still got a number of things to do to get the car finished, I've started the door card's, fitting the electric window controllers, nav light, wiring for the front lights, tool storage, safety gear storage and cleaning and painting some of the parts that need to go back on the car.
June Update - The Car v The Shed
Hi everyone progress on the car has slowed a little since the last time I posted. The big push over the past few months is to get the shed extensions completed before it starts to rain here in Queensland. The good news is the shed is now at lockup stage just as the rain has started here, with just some internal cladding
to complete the project. I now have a dry clean work area for the car and I can work on the car at nights, which I have not been able to do in the past.
Although my priority has been to get the shed build, (I'm building it all myself), the car is still being progressed by others, its made its way back to NA Autosport and Engineering to have some bits a pieces installed, mostly items that where to heavy or I was not confident in tackling myself. So far Nick and the guys have installed the flywheel, clutch and 6 speed gearbox into the car, and will be running the
brake and fuel lines in the car as well as installing a new set of 50mm DMS (Drummond Motor Sports) suspension. We where going to replace all the rubber bushes in the rear suspension, but due to the floods in Japan we have not been able to get any new bushes from Subaru in time, so the rear suspension has been
upgrades to newer STI items with trailing arms, rear links, strut tops and sway bars all replaced. Now when you look under the car its all just about STI gear, the only items that are not STI are the front and rear cross members and the RS auto drive shaft, (not including the engine which is stock RS).


The car has also had the paper work completed to get a CAM's log book, thanks to Dave the scrutineer who kindly came out and gave the car the tick of approval. For the car to be approved based on the 2011 roll cage specs I have to have the paper work done by August this year.
Once the car is done at NA Autosport and Engineering and in the new shed, I will be looking at getting the rest of the car together, turbo, intercooler, engine electrics and push the big red button and see what happens.....to be continued...
April 22th 2012 - Day 63 - The light at the end of the tunnel
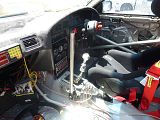
I keep meaning put more into this Blog, but I just never find the time. It's been 3 months since the last update and yes a lot has been done to the car. Most of the work has been centred on the inside of the car. Most of the electrical work has been done, with only a few items left to wire in, including the DCCD controller, Nav Light and the Nav switch well that's all I can think of right now.
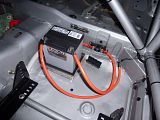
The dash mods got a working over as did the wiring diagram, basically I rewired the dash and replaced the switches I started with, with a set of 6 switches I purchased from a boating supplier, this both looks neater and works better. I'm finding out that the third time I do things it's the right way. I've also run the battery power leads, these are made up of welding earth cables with large terminals, purchased from a welding supplier.
Updated Wiring diagram
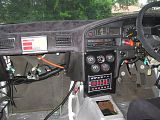
After a few tests with the multimeter I turned on the new switches and tested everything, and so far everything worked, rally computer sprung to life, gauges, new window heaters, Stilo headsets, and all of the normal car electrics. When I say everything worked, the horn didn't, well not at first, it took me about 3hrs to finally work out that I had forgotten to plug a connector together under the dash. Anyone doing one of these cars in the future, the wiring diagram is wrong, the horn signal is part of the cruise control plug that comes from the instruments.
One of the items on the to do list was the Aero Catches or bonnet latches, it's something you need on the car, but you need to cut into your bonnet and there is no going back once you start. So last weekend I took to the car with a die grinder and drill, in the end the results were good, no mistakes and the job looks clean. I also wrote a quick how to for anyone looking at doing the same thing, you can find it here, Aero Catches Install

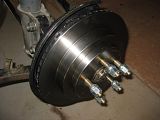
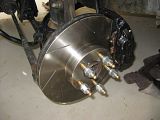
Next item was to install the bigger brakes, these are from the 2003 STi and just clear the 15in rims I have, nice and shiny.
Today I had a bit of time and so started installing some roll cage padding, installed and high density padding around the head area, and the cheaper padding around the legs. I'm not to happy with the cheaper padding as it's so thick, so I'm thinking of going the high density padding here as well.

So what's next for the car? Well I need to get the gearbox in and the car started, also have the hydraulic handbrake mounted next to the gear stick and then I can run the brake and fuel lines in the car. Once that is done I'm on the home straight, that will only leave a few smaller items and the new shocks left to do.
The dash mods got a working over as did the wiring diagram, basically I rewired the dash and replaced the switches I started with, with a set of 6 switches I purchased from a boating supplier, this both looks neater and works better. I'm finding out that the third time I do things it's the right way. I've also run the battery power leads, these are made up of welding earth cables with large terminals, purchased from a welding supplier.
Updated Wiring diagram


After a few tests with the multimeter I turned on the new switches and tested everything, and so far everything worked, rally computer sprung to life, gauges, new window heaters, Stilo headsets, and all of the normal car electrics. When I say everything worked, the horn didn't, well not at first, it took me about 3hrs to finally work out that I had forgotten to plug a connector together under the dash. Anyone doing one of these cars in the future, the wiring diagram is wrong, the horn signal is part of the cruise control plug that comes from the instruments.
One of the items on the to do list was the Aero Catches or bonnet latches, it's something you need on the car, but you need to cut into your bonnet and there is no going back once you start. So last weekend I took to the car with a die grinder and drill, in the end the results were good, no mistakes and the job looks clean. I also wrote a quick how to for anyone looking at doing the same thing, you can find it here, Aero Catches Install

Next item was to install the bigger brakes, these are from the 2003 STi and just clear the 15in rims I have, nice and shiny.


Today I had a bit of time and so started installing some roll cage padding, installed and high density padding around the head area, and the cheaper padding around the legs. I'm not to happy with the cheaper padding as it's so thick, so I'm thinking of going the high density padding here as well.


So what's next for the car? Well I need to get the gearbox in and the car started, also have the hydraulic handbrake mounted next to the gear stick and then I can run the brake and fuel lines in the car. Once that is done I'm on the home straight, that will only leave a few smaller items and the new shocks left to do.

Subscribe to:
Posts (Atom)